Archetypes Editor Primer
Introduction
The purpose of this guide is to introduce the user to the concept of archetypes and to demonstrate how to create and model an archetype using openEHR’s (open source) software – the Archetype Editor. The modelling process described in this document has been written primarily for users who wish to create novel archetypes for clinical decision support (CDS) applications. Therefore, several concepts and features of archetypes have been intentionally omitted or discussed only briefly. Resources containing more in-depth information are available on the Links & Resources page. There is also a link to Cambio Healthcare Systems CDS Apps Showcase Page on GitHub available in this section, containing over 100 demo applications (using 250+ archetypes and 200+ guidelines).
The guide has been written by the Clinical Modelling Group at Cambio Healthcare Systems. If you have any questions or would like to provide feedback on this document, please send us a message by visiting the Contact Us page.
What is an Archetype?
Archetypes are at the core of the openEHR specification. They are computable, and human-readable, reusable discrete models of health information and serve as containers for standardized clinical data definitions structured in a way that can easily be understood and maintained by healthcare professionals. Each archetype represents a discrete clinical concept and is intended to be exhaustive, containing every possible data element that makes clinical sense about the specific concept. An archetype can be described as a governance unit for a set of data elements allowing a broad definition and minimal constraints to allow sharing and reuse across different healthcare settings and clinical scenarios. It is commonly expressed in Archetype Definition Language (ADL), though ‘more friendly’ XML and JSON formalisms also exist. In addition, archetypes support all the ISO 639 languages and archetyped data will always have the same meaning regardless of context, what system or what language is being used; thus fulfilling the concept of semantic interoperability. As an example, archetypes exist for heart rate, blood pressure, Apgar score, weight, height and body temperature – all discrete clinical concepts. They are the concept-level foundational building blocks of healthcare data, or an electronic health record system (EHR).
To become operational, archetypes are logically aggregated and constrained to create context-specific data sets and documents known as Templates, examples of which include an antenatal visit, a discharge summary or a patient review. Archetypes and Templates constitute the openEHR Archetype/Knowledge model, provide formal definitions of clinical content, and are the concern of the healthcare professional. On the other hand, how health data is represented in a patient record as well as the basic entities for representing information in an EHR, is provided by the openEHR Reference/Information model and is the concern of the IT professional.
An example of an archetype is shown below:

Getting Started
Archetype Editor
The Archetype Editor is the primary tool for authoring and editing archetypes. It is a Unicode-enabled program, available in many different languages and supports archetypes in all Unicode standard languages. It is dependent on Microsoft’s .NET framework and thus requires a MS Windows environment with .NET 2.0 (or higher). The software also works well in a virtualized MS Windows environment with .NET capability.
AE allows created archetypes to be saved as either XML files or the more popular ADL 1.4, but supports viewing the archetype definitions and metadata in RTF, XML, ADL or HTML. The application is developed and maintained by Ocean Informatics/openEHR Foundation and the latest version (still in beta) can be downloaded at: http://www.openehr.org/downloads/modellingtools
Open the installation file and follow the instructions on the screen to install the program.
Before creating a new archetype, it is in the spirit of the openEHR reuse philosophy to first check if a published version (final iteration) of that archetype already exists in any publicly accessible archetype repository. See the Links & Resources page for a list of major public archetype repositories.
Creating an Archetype
Start-up Menu
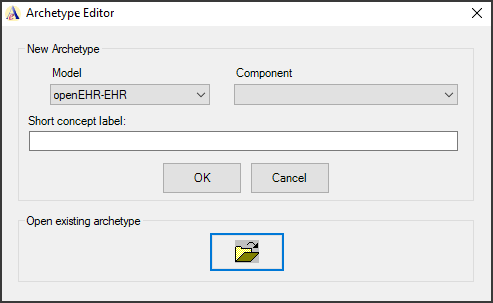
When launching the Archetype Editor, the following start-up menu will be displayed. The user can choose between creating a novel archetype (by selecting the relevant component, and writing a short concept label), and opening an existing archetype (by clicking on the yellow folder icon). The model is set to openEHR-EHR by default (which denotes the resultant archetype is modelled after the openEHR EHR specification) and cannot be changed in the latest Archetype Editor version. In the component drop-down menu, the user decides the type of archetype they wish to model. Our CDS applications are primarily based on observation and evaluation archetypes. A detailed explanation of the available archetypes is provided in the next section. The short concept label is used to name the archetype.
Components
Choose a component for the archetype. The available options can be seen in the screenshot below.
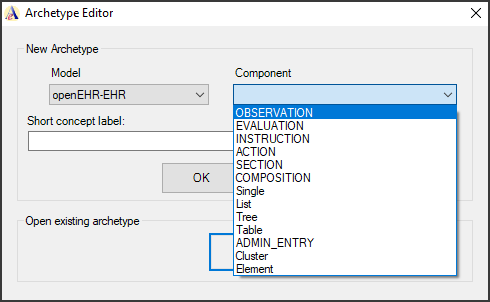
When modelling archetypes for CDS applications, the observation component is most commonly used. Observation archetypes are used to document and store data components and values related to a given clinical concept that can be observed or gathered at a specific point in time. One example of an observation archetype would be blood pressure, where one can store information about components of the clinical concept; i.e. systolic blood pressure, diastolic blood pressure, mean arterial pressure, patient position during measurement (sitting or lying down), etc. These individual components or properties of the clinical concept are referred to as data elements (later in this document we elaborate on the data element types supported by the archetype editor). Other examples of observation archetypes are height, weight, and pulse oximetry. Information about the timing of the observation/measurement is often relevant in observation archetypes.
Evaluation archetypes are the second most commonly used archetypes for CDS applications. They are typically used to store an assessment or evaluation of data obtained from an observation archetype. The corresponding evaluation archetype for the blood pressure example would include potential interpretations of the blood pressure – such as normal blood pressure, hypertension, or hypotension. Additional examples of evaluations are adverse reaction, diagnosis and family history. Evaluation archetypes do not typically require a time component.
Short Concept Label
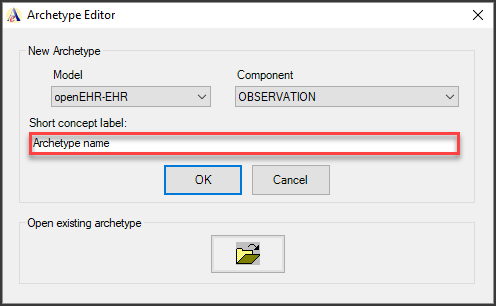
Once the component type has been selected, enter a name for the archetype in the Short concept label box and click OK.
Elements
The data elements of an archetype represent the individual components, subcomponents, or properties related to the relevant clinical concept, as well as their derivatives (e.g. blood pressure has a systolic component; mean arterial pressure is a derivative). The values of these elements may take the form of textual data, numerical data, date/time stamps, Boolean variables or even another archetype (a special type of nested archetype). The Definition tab in the modelling window is where the data elements and their attributes (description, unit of measurement, permissible values etc.) are added.
The vertical toolbar highlighted in red is where we can select from one or more options of the different data element types for use in the data definition of our archetype.
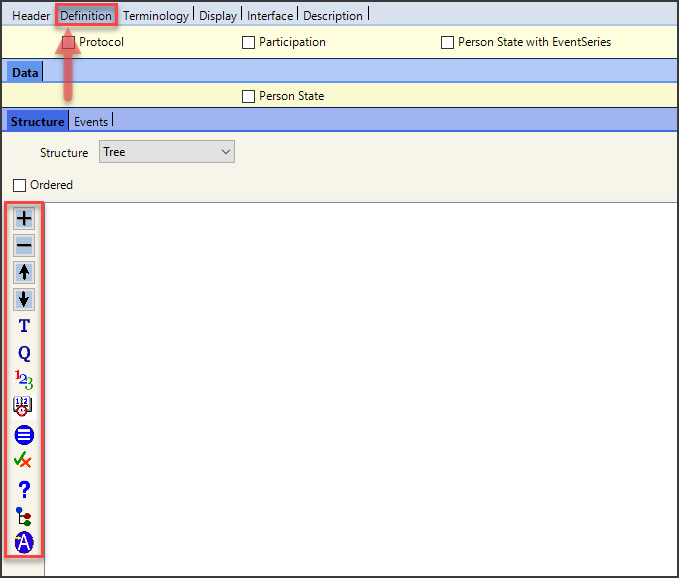
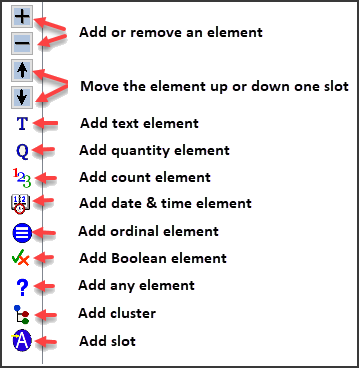
Each icon available in the toolbar is described below:
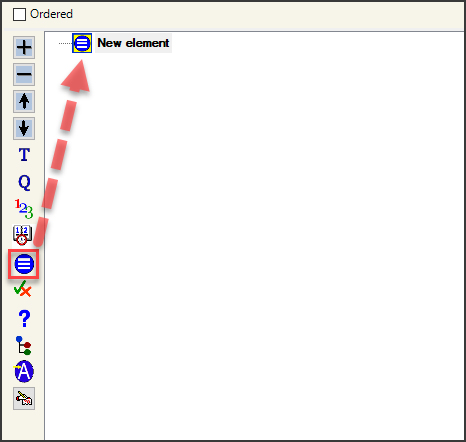
To add elements to the archetype, simply drag the data element types of interest from the vertical toolbar and drop them into the main modelling space.
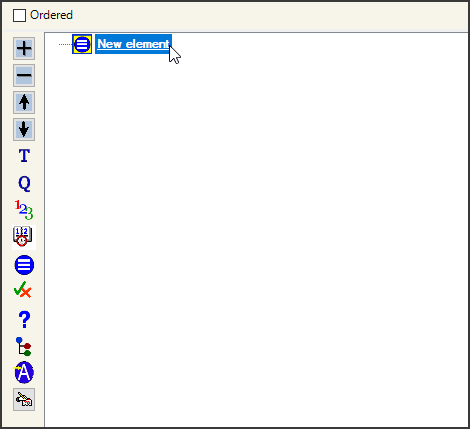
To change the name of the data element, simply click on the New element text box.
Text Element
When the possible values of a data element consist of only textual or alphanumeric characters, the text element type is used. The text element type allows the user to enter free text into a textbox (choose Free text or coded), select from a drop-down list with predefined options (choose internal codes), or select from options presented by an external reference terminology set (choose terminology). The terminology option is rarely used during archetype authoring, but if required may be defined elsewhere in the modelling process.
Text box
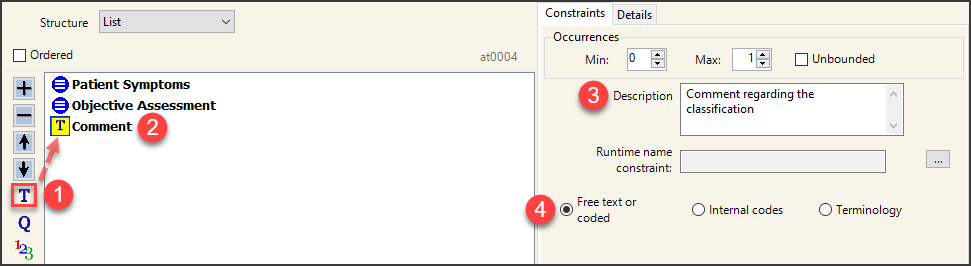
Adding a text element (text box):
- Drag and drop the T (Text element) from the toolbar into the main modelling space.
- The default element name is New element. Enter an appropriate name for the element after clicking once on the text field (here we have created a data element and renamed it Comment).
- Add metadata in the description box to elaborate further on the purpose of the element.
- We have chosen Free text or coded which ensures the user will be presented with a textbox where they can enter data in free text.
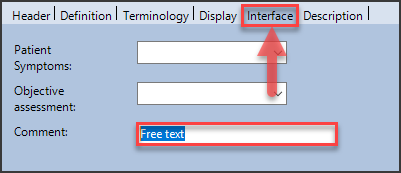
Click on the Interface tab to access the interactive graphical user interface where the data elements included in the archetype can be tested. The text data element is encased in red.
Drop-down List
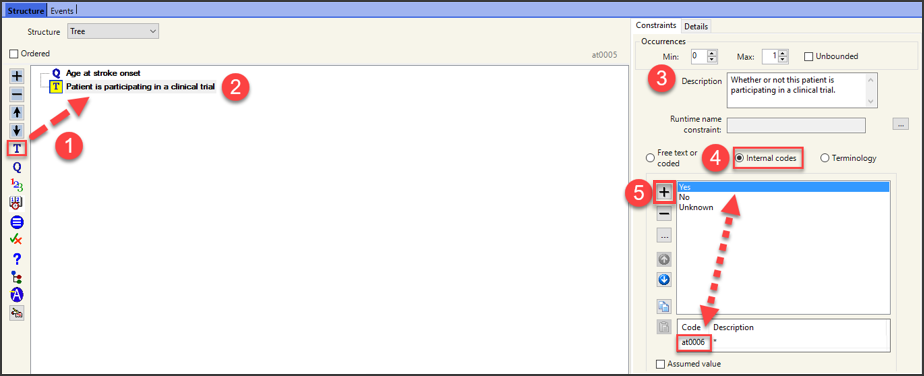
Adding a text element (drop-down list):
- Drag and drop the Text element from the toolbar into the main modelling space.
- Name the text element (in our example, “Patient is participating in a clinical trial”).
- Include a description (e.g. “Whether or not this patient is participating in a clinical trial.”)
- Instead of Free text or coded, select the Internal codes radio button.
- Using the + button (encased in red) we will create a drop-down list with 3 alternatives: Yes, No, and Unknown. After each value has been created, an at-code is assigned automatically as shown at the bottom of the image. The first alternative in the list is “Yes” and has been allocated the at-code: at0006.
Repeat step five to include additional alternatives in the drop-down list. Each new term will be assigned a unique at-code. To remove an item from the list, select the term in the list of alternatives and click on the minus button instead. The arrows below the plus and minus buttons rearrange the order of the terms in the list.
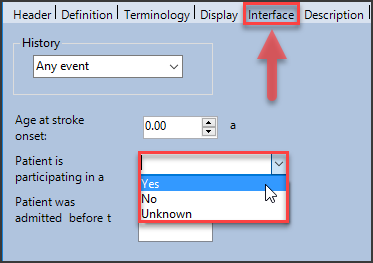
By clicking on the Interface tab, the coded text data element is now available for testing in the form of a drop-down list:
Quantity Element
The quantity data type is used when creating a data element that takes only numerical values with units. It supports integers and decimal numbers (float data type). Below is an example from the bicarbonate deficit archetype:
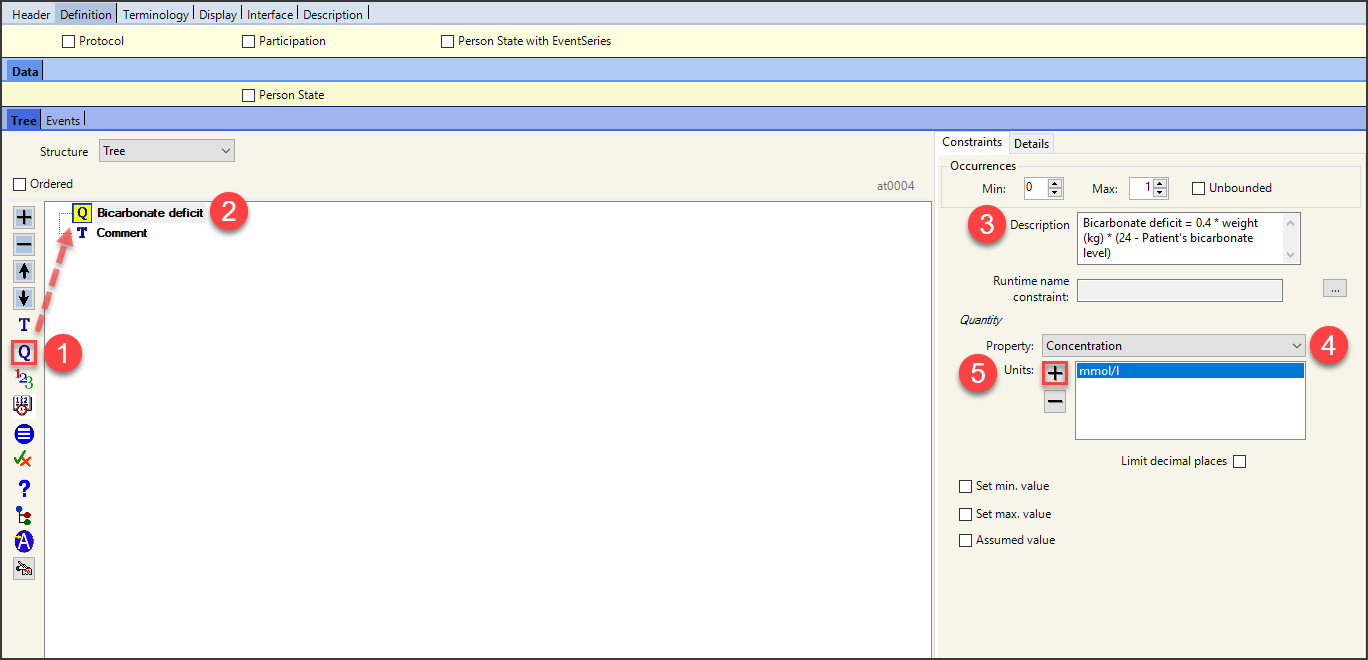
Adding a quantity element:
- Drag and drop the Q (Quantity element) from the toolbar into the main modelling area.
- Name the element.
- Add a description of the element.
- In the Property field on the right, select the most suitable alternative from the drop-down list, in this case concentration.
- In the Units field, click on the plus sign to add units (example below).
Adding Units
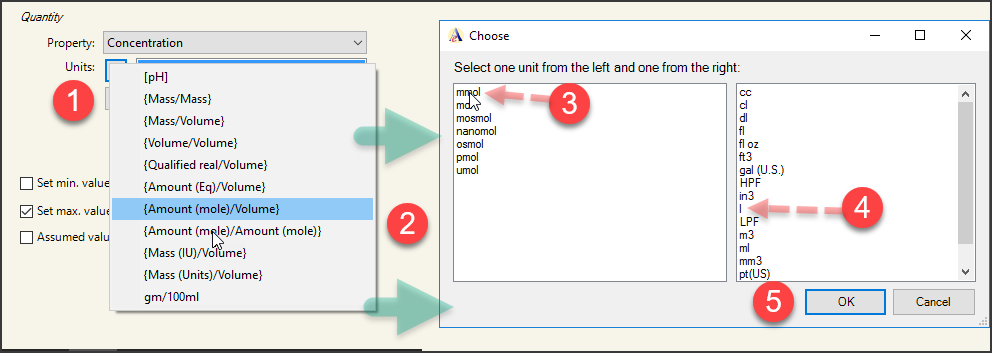
Adding units to the quantity element:
Once the plus sign is clicked in the Units field, a new window appears as shown in the image above. To add a set of units (mmol/l in this example), complete the following steps:
- Select {Amount (mole)/Volume}
- A new box will open allowing you to select your units.
- Choose mmol in the left section.
- Choose l (litres) in the right section.
- Click OK to build the complete unit of mmol/l.
If required, repeat this process to add multiple units to the list of available options. For example, in addition to mmol/l we can include mEq/l, µmol/l, or any other unit that is expected to be encountered in practice when measuring bicarbonate concentration.
The interface view of the bicarbonate deficit element is available below. Because only one set of units was added to the element, the units is fixed to mmol/l.
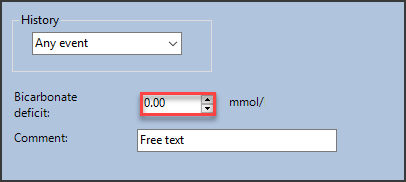
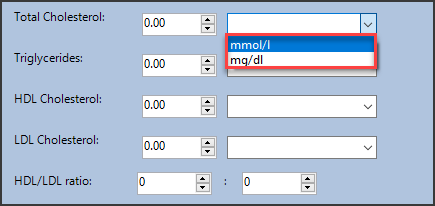
When multiple units are added to the quantity data element, a drop-down menu containing the options will be available for the user to choose from.
Count Element
A count element can be used to store positive and negative integers. Most commonly, it is the element of choice for Total score when the other elements contained in the archetype are ordinals. The count element cannot handle decimal numbers and has no units.
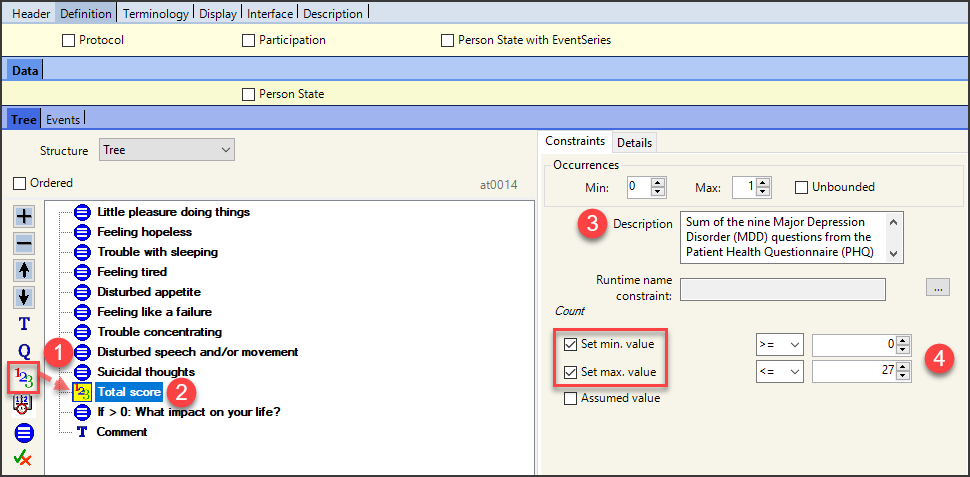
Adding a count element:
- Drag and drop the 123 (Count element) from the toolbar into the modelling area.
- Name the element.
- Add a description of the element.
- Use the set min value and set max value constraints to set the minimum and maximum range for the score.
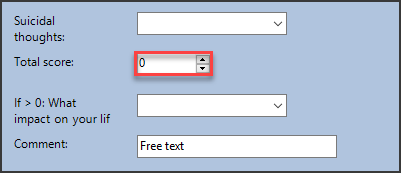
Interface view of the count element:
Ordinal Element
One of the simplest models to create is one with ordinals that allow users to choose between different alternatives that have an ordinal value linked to them – such as scores for a question in a protocol. The ordinal values can then be summed to create a total score (the total score in such a case would be a count element). Ordinals can also be used to simply select an alternative from a scale – see the example below of the New York Heart Association (NYHA) classification for heart failure severity.
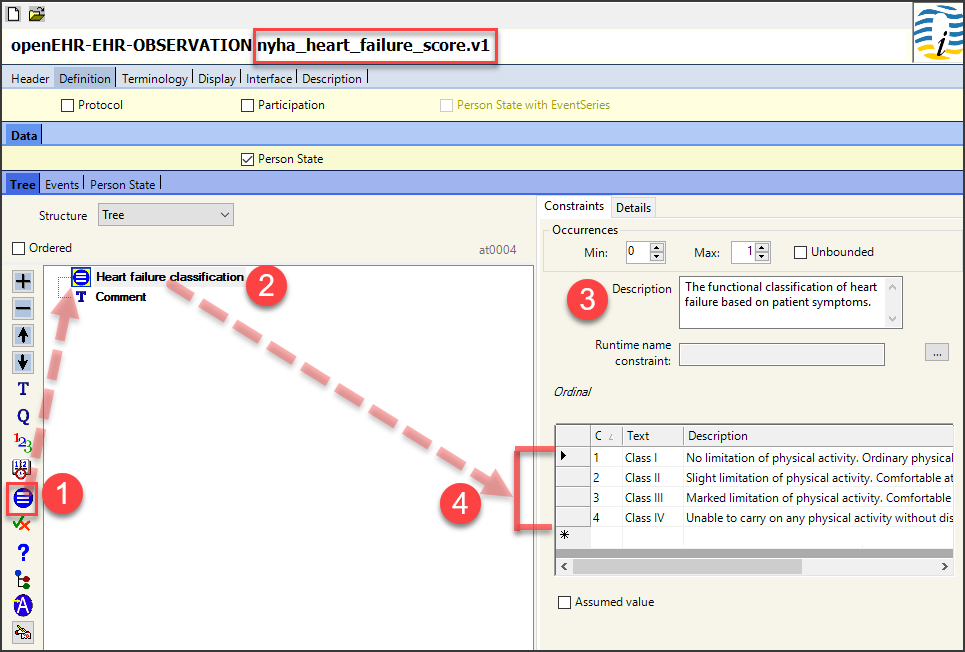
Adding an ordinal element:
- Drag and drop the ordinal element from the toolbar into the modelling area.
- Name the element.
- Add metadata in the description box to elaborate further on the purpose of the element.
- Create the desired number of alternatives by entering the relevant ordinal values in the first (ordinal) column (ordered from lowest to highest!). Then, text and descriptions can be added in the second and third columns respectively.
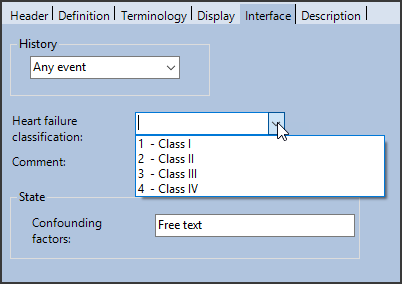
By clicking on the Interface tab, we can see that the ordinals we have created for the NYHA archetype are displayed in order from Class I to Class IV.
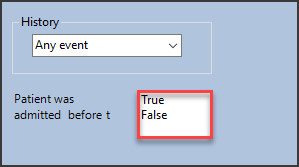
Boolean Element
Boolean elements are used when dealing with True or False statements. A similar functionality can be established using the ordinal or text elements, which is often the preferred method of choice. The reason for this is that they provide more flexibility by using other alternatives (yes/no, never/always, 0/1, etc.). The True/False Boolean values cannot be changed, and due to limitations in the current software translation into other languages is not possible. For this reason, Boolean values are only the preferred option if the application with absolute certainty will be used in English only, which due to the nature of the openEHR is not a desirable approach as it conflicts with one of the main functions of the structure; reusability.

Adding a Boolean element:
- Drag and drop the tick/cross (Boolean) element from the toolbar into the main modelling space.
- Name the element.
- As the Boolean data type only has True/False representation, the available choices are automatically selected upon creation.
On the Interface tab, the Boolean field is shown at the bottom, where the alternatives True or False can be selected.
Cluster Element
This element type is used when it is desirable to group certain components/subcomponents of the clinical concept in question. The asthma predictive index archetype has major and minor criteria; some of the individual data elements have been clustered to reflect this.
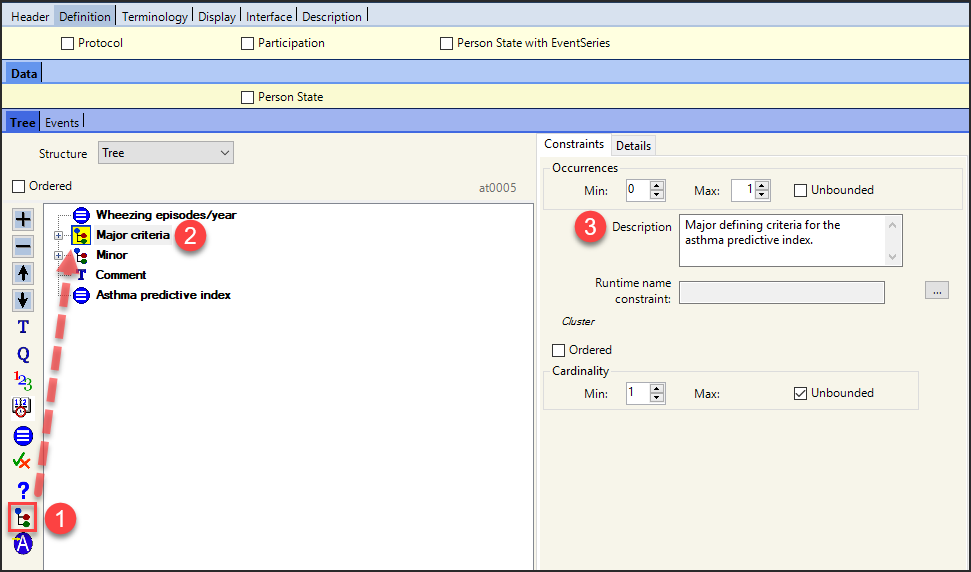
Adding a Cluster element:
- Drag and drop the cluster element from the toolbar into the main modelling space.
- Name the element.
- Add a description for the element.
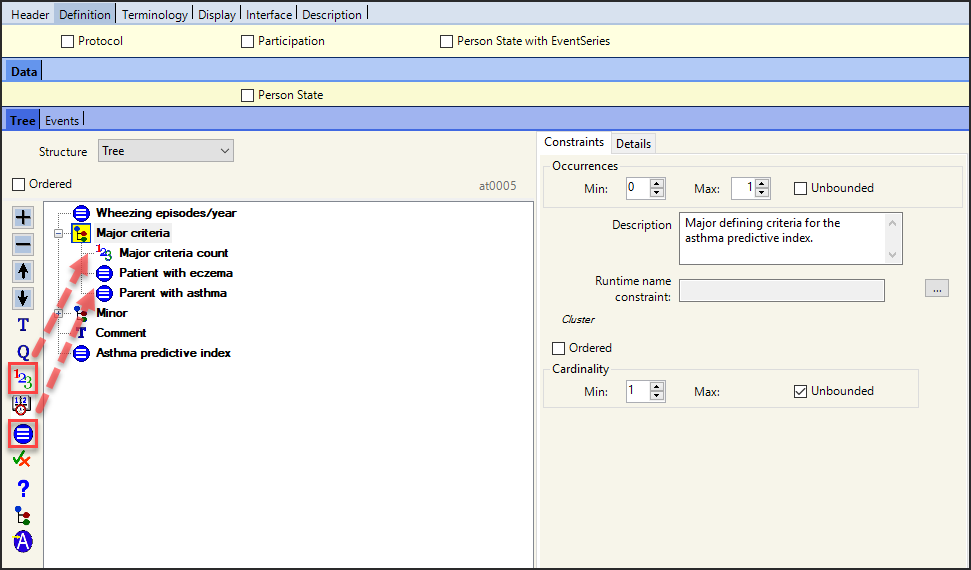
The cluster does not in itself hold any textual or numerical value directly relevant to the clinical concept, but rather serves to group the elements of interest that contain the actual values of interest.
Once the cluster has been added, named and described, go ahead and drag and drop the actual relevant elements of interest (in this example, the ordinal and count elements) on the named cluster and then further define them as described in the earlier sections. As seen in the image following, a tree structure is automatically created when elements are added to a cluster.
Take care to drag and drop other elements that are not related to a cluster to the ‘root level’ and not under a cluster.
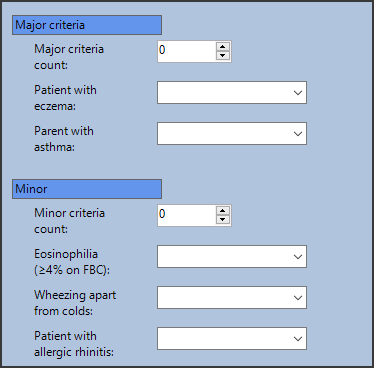
The resulting design in the interface tab is shown below:
Terminology
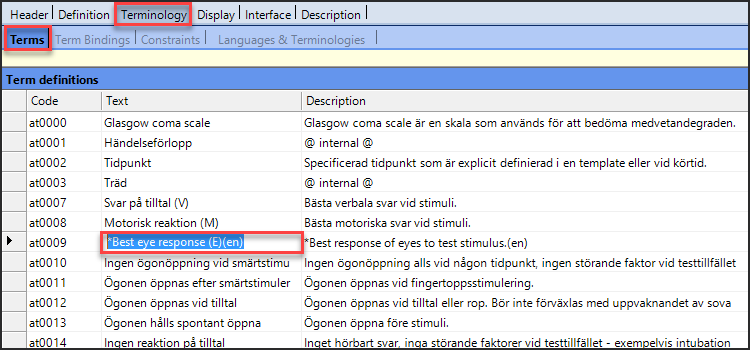
Once all the metadata (header and description tabs) and elements (definition tab) have been created, we can view the underlying allocated at-codes by clicking on the Terminology tab and viewing the Terms subtab as shown in the image below. The elements and the archetype title are assigned an at-code as shown in the first column, thus creating a structured overview of the data available in the archetype. Therefore, it is also highly recommended that this tab is used when translating the elements of the archetype.
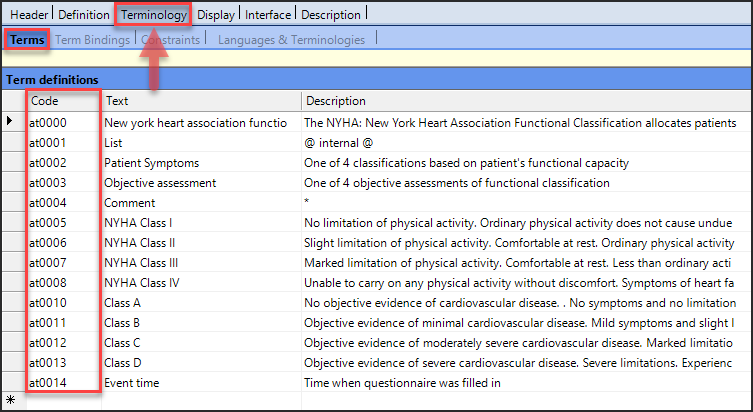
The openEHR specification has its own set of internally generated term definitions (unique to each archetype) created automatically during the archetype authoring process by assigning at-codes of the format atXXXX to the concept label (always at0000), the defined data elements as well as any preconfigured values for those elements. In addition, the archetype editor supports binding of the data elements and at-codes to an external terminology set (e.g. SNOMED CT, LOINC). We generally avoid binding archetype data elements to external terminology sets from within an archetype, but instead perform such bindings within guidelines (GDL applications used in clinical decision support) or openEHR templates.
Metadata
Archetype Information
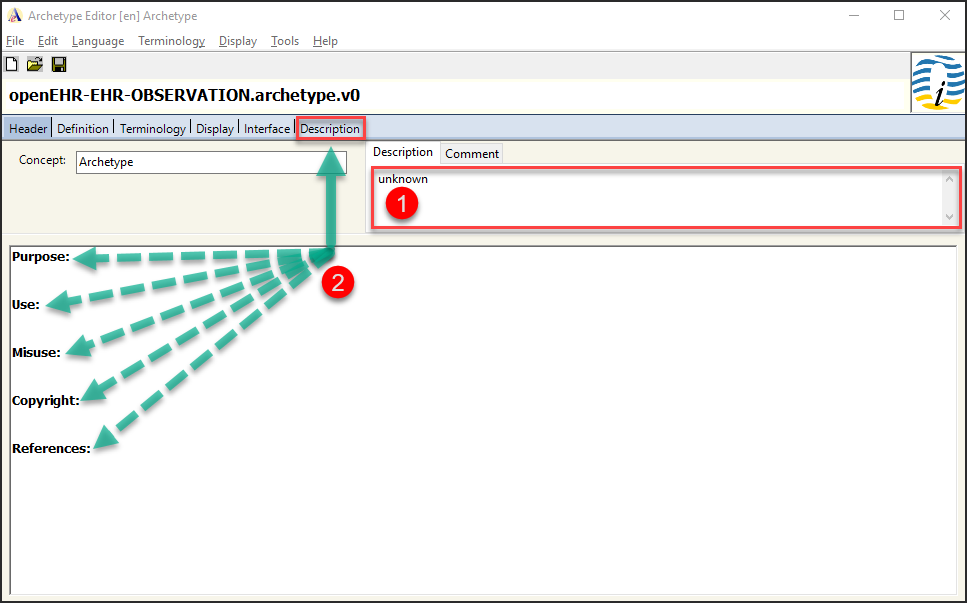
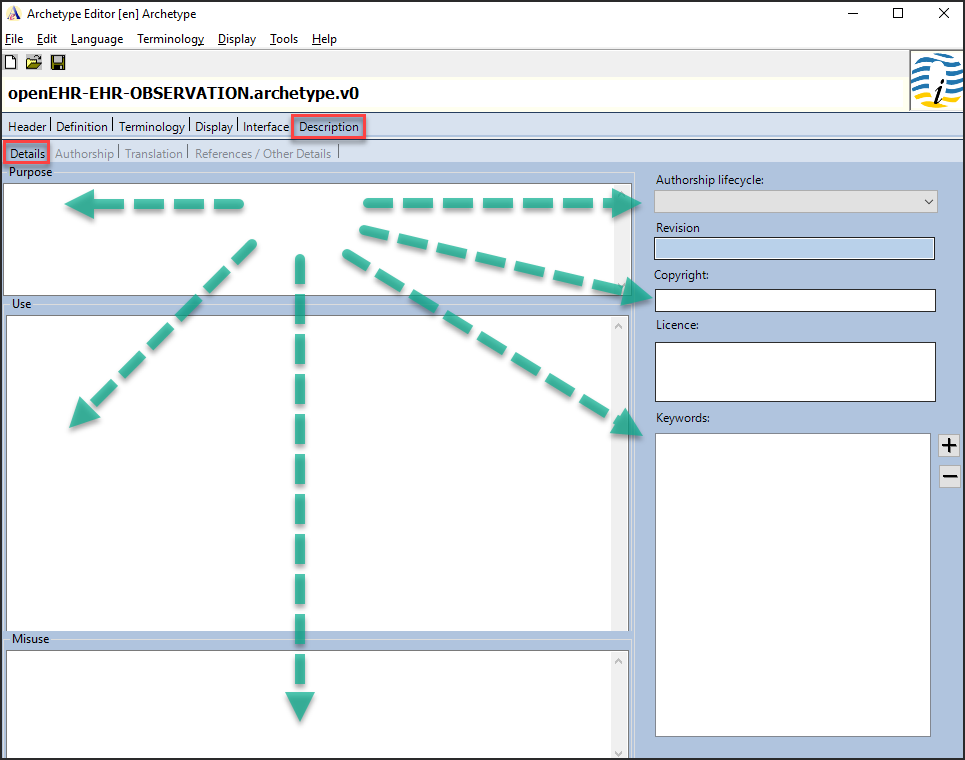
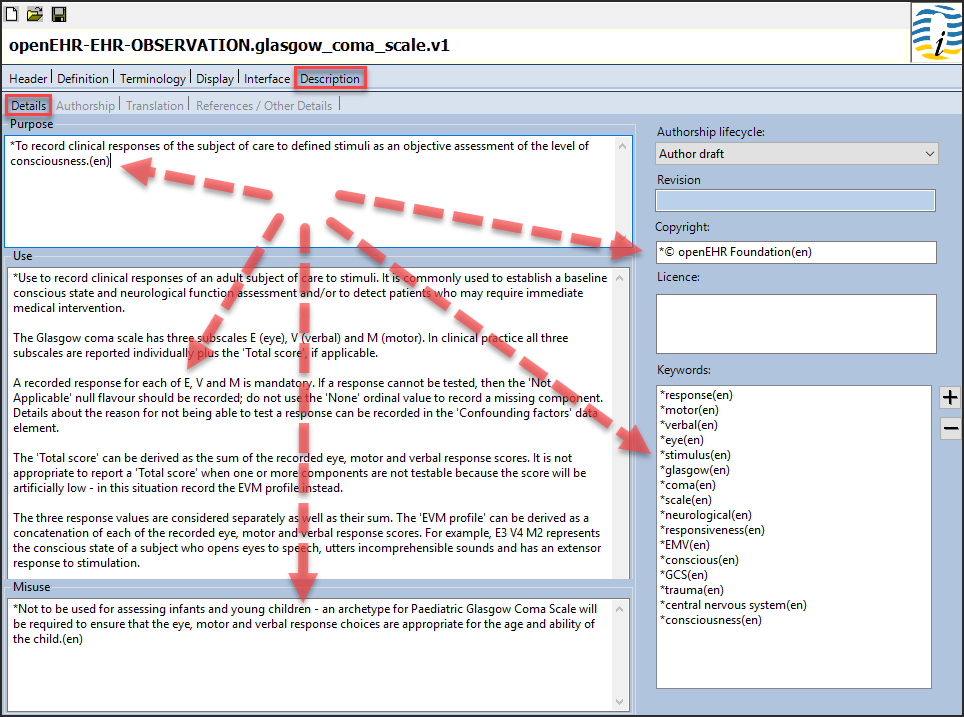
Once the archetype has been created, metadata (detailed information about the archetype) should be entered. This includes clinical information, archetype description, clinical definitions, author information, copyright, date of creation, references, contributors, and keywords for the archetype.
To add metadata, click on the Description tab in the blue section near the top of the view in order to fill in the fields: Purpose, Use, Misuse, Copyright (if relevant), and References. On the Authorship Lifecycle one can choose Author draft, since the model is still under development. Keywords can be added with the plus sign and removed with the minus sign. To enter information about Authorship, Translation, References/Other Details, simply click on the corresponding subtab.
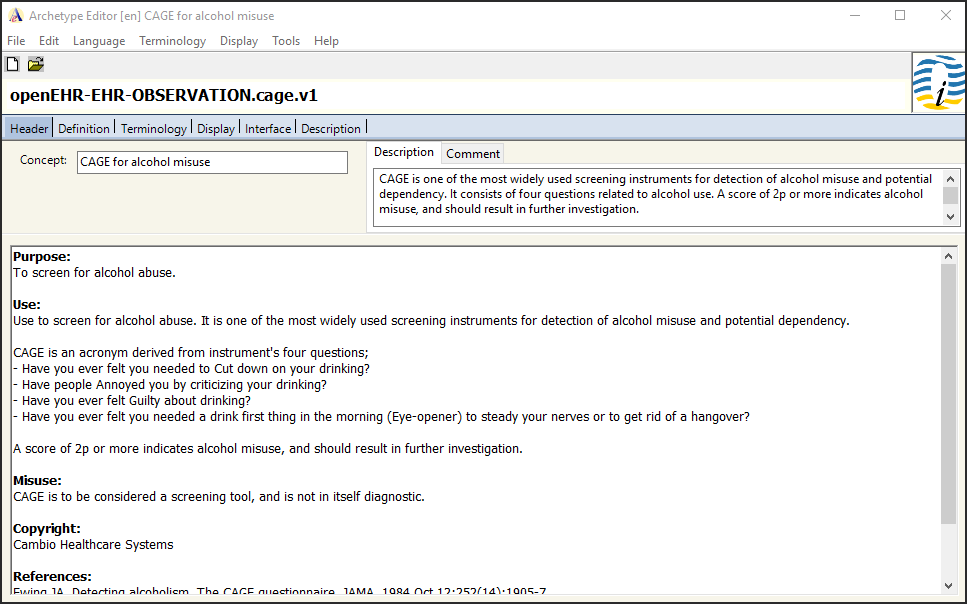
An example showing how metadata in the Header tab can be formatted:
Authorship
The image below depicts the Authorship tab, the second tab under Description. This is where information about the primary author is added as well as names and organizations of contributors or co-authors.
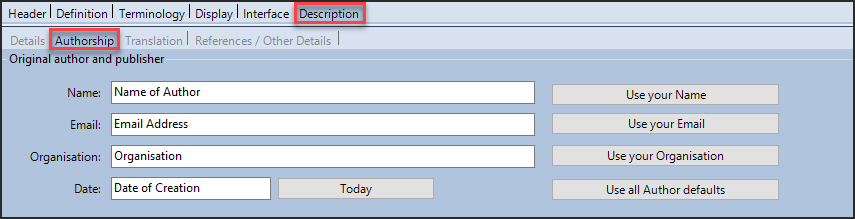
The next step is to add contributors, which

To add contributors:
- Fill in the primary author’s name, email address, organisation name, and date of creation.
- Click on + to open the window in order to add the contributors one by one. The image shows that there has already been one contributor added and a second is in the process of being added with the + button.
- Name the contributor (and organization) in the text box.
- Click OK to add the contributor to the list.
References
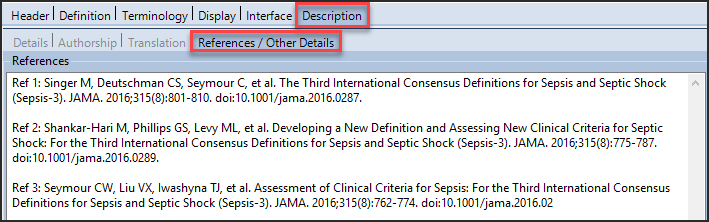
The image above shows the content of the last tab under Description, which is the References/Other Details tab. This is where the archetype’s references are listed. Any referencing/citation style is fine, but make sure all references are numbered and that the same format is used throughout the model.
Languages
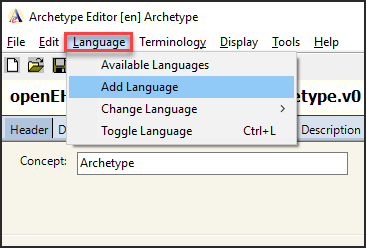
To translate the archetype to another language, perform the following steps:
- Click on the tab Language and select Add Language.
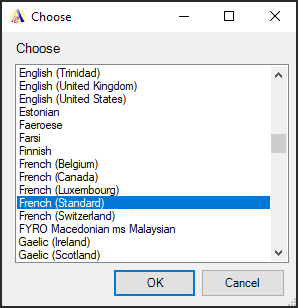
- From the break-out box, select the desired language from the list.
- Click OK.
After this has been done, click on the Language tab again and select Change Language and choose the language you just added.
Once the language has been selected, head over to the Terminology tab. This tab contains all of the text that belongs to the elements as well as the model title. Simply replace the English *(en) with the target language translation in the Text and Description columns for each term.
The metadata can be translated in a similar fashion – simply go to the Description tab, click on Details, and translate the metadata to the language of choice.
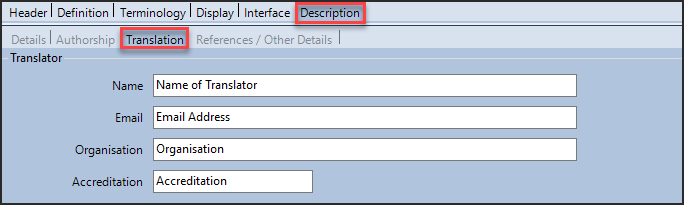
Once the translations have been added to the archetype, details about the translator are added in the Translation subtab under Description.